How To Redo Bathroom Vanity
Related blog posts:
–GUEST BATHROOM
–BATHROOM MAKEOVER – MOOD BOARD & PLANS
–REFRESH YOUR OUTDATED TILE WITH PAINT!
This post is in partnership with Rust-Oleum .
The power of paint! I love using paint to transform just about anything. It is by far the easiest way to update a space. There are a lot of things to consider when choosing a paint solution. What are you painting? What kind of prep work is involved? What is the dry time? What is the cure time? Do I need a topcoat?
All of these are questions you should consider for your paint project and, to be honest, there's usually more than one answer. Rustoleum asked if I wanted to try out their Cabinet Transformations Kit and I was so excited to share the results! This was one of the most rewarding projects I've done to a space and it only took a few hours of working time. If you have any outdated cabinetry in your home, this post is for you!
Here's where my vanity started!

I picked up Rust-Oleum's Cabinet Transformation Kit at Home Depot and had them tint it right at the paint desk. The kit comes in both a light and a dark tint base and then you can have Home Depot tint the kit to one of their 48 colors! I chose black of course and here's what it looked like after just a few short days!
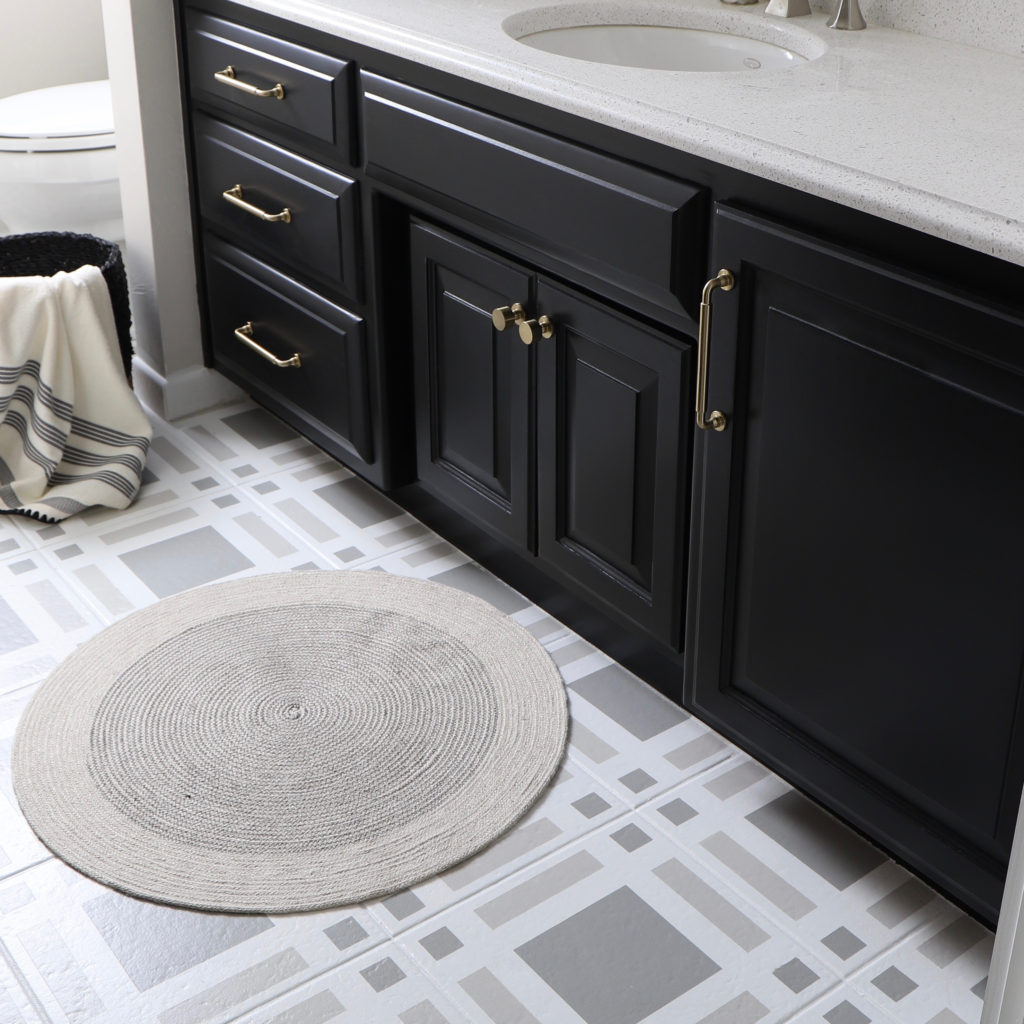
The before and after was amazing and just required a little painting, new hardware… and what would equate to a little over a weekend worth of work. You might also notice the painted floor in the after photo (yes, that is painted tile!). You can read all about that project here.

My favorite thing about this kit is that it is perfect for beginners with step by step directions. It comes with (almost) everything you need to complete a project from start to finish… as well as detailed instructions!
Here's a breakdown of the recommended steps!

The first thing I did was removed all the doors from my vanity and took off all the hardware and hinges. I used the included deglosser to thoroughly wipe down both sides of each cabinet door and the vanity itself. Deglosser is this magical solution that removes gloss from cabinetry or doors without sanding!
This step is important and allows paint to properly adhere to a finished surface. To apply it, I just soaked a scrubbing pad (included) and wiped the door down in the direction of the grain, making sure to go over each area thoroughly until I noticed a dullness in that area. (Note: if your cabinets are previously painted, I would recommend sanding).

The next step involved filling all the old hardware holes with wood putty or a wood filler. You can skip this step if you plan on keeping the same hardware or will use the same holes.

Wait at least an hour for the wood filler to dry/harden and then sand smooth with 120 grit sandpaper.

The directions don't recommend priming and I'm sure you would get similar results without it, but I always like to use primer. This BIN primer sticks to anything and everything and is a great insurance for a good paint job. It is especially good at sealing knots and odors in case there are any smells stuck in your wood!


I like to use a brush first on any detailed spots or insets, then follow it with a roller to smooth out brush strokes. You have to work fast with this primer, it dries super quick!


After 20 minutes or so, I turned over the doors and repeated on the other side. I waited an hour after this and then sanded both sides with 220 grit sandpaper.

Painting is a pretty straightforward process and the instructions were very clearn in regards to dry time and recoat time. It's always a good rule of thumb to paint the backs of cabinetry first so when you flip them, any marks will end up on the backs instead of the fronts.

Each coat requires 2 hours before the next coat – so you should be able to paint 4 coats (2 on each side) in a day!


I used the same strategy of painting the insets with a brush and then followed it with a roller.

I wanted to tackle ALL of this within one weekend so I worked on the actual vanity while the doors were drying. I used painters tape to tape all around the vanity and inside the edges to make the painting go smoothly. Make sure to follow the same steps!


The last step for this was the topcoat! This was the step that I was most concerned with from reading reviews. I decided to test one door to figure out the best way to tackle this.
The topcoat is white and milky in color which I think is good because it allows you to see how thick it is being applied. There were a few areas that dried with this white tint where it was applied too heavy. I sanded it down, reapplied a coat of black, and then applied the top coat much lighter this time with a brush ONLY – not a roller. This went against my normal painting instincts… but trust me on this, the roller was not the best tool for the topcoat. I had no issues with the rest of the doors and the finish came out perfect!

I'm a big fan of using hardware to update cabinetry so this project was no exception. I used these brass pulls and knobs that I found on Amazon and my handy Kreg jig to line them up perfectly.

A few minutes of re-installing door fronts and drawers and I had a brand new vanity!

Can you believe this is the same cabinetry? There are lot more updates to come in this bathroom so follow along for the final reveal coming in a few weeks!

Source: https://makingprettyspaces.com/2019/10/01/transform-your-bathroom-vanity-in-a-weekend/


0 Komentar